Unit testing Android apps is easy, thanks to integrated testing tools. However, the only officially supported way of running the tests is on the Dalvik VM, either on a real device or in an emulator. The practical ramifications of this are a long test run startup time, and the arguably more serious matter of making running tests in a CI environment difficult to say the least. Even if you manage to set up an AVD on your probably headless build agent, you'll still need to perform more magic to get jUnit XML reports out of the AVD and onto the agent for your CI system to parse them.
This is widely known by now, and there is a solution: Robolectric makes tests run outside Dalvik in a regular JVM, and this nicely solves the problems with startup time and the XML reports, allowing testing in CI. If, however, you like using Android Studio to develop, as I do, you now have a new problem: your Robolectric-powered jUnit tests are in a folder that Android Studio does not recognise as a sourceset, and therefore you essentially lack all the Java tooling goodies. Oh, and due to your project layout you need to write your own test runner. Oh yeah, and after that you'll probably need to do more buildfile tweaks so your runner isn't picked up as a test, with an unhelpful error message.
Sound like a lot? It is, and unfortunately the info is spread thin around the net, with many references to deprecated gradle plugins and whatnot. Someone called Kostya Y got me pretty darned far, but no single guide took me all the way to my goal. That's why after a recent success setting a project up for test runs in both CI and Android Studio, I wanted to write up the steps I took all in one place.
Project Structure
This guide assumes a structure identical to the one Android Studio creates, with a main project and an app submodule inside of that:
    MyProject
     ├── app
     |   ├── build.gradle
     │   └── src
     │   └── main
     │      ├── java
     │      │   └── com
     │      │   └── ...
     │      ├── res
     │      | └── ...
     │      └── AndroidManifest.xml
     └── build.gradle
Robolectric
When writing Robolectric unit tests, we are going to entirely bypass the jUnit 3 -based Android testing framework. Therefore the first thing we're going to do is pull in Robolectric and jUnit 4 as dependencies, by adding them in app/build.gradle:
    dependencies {
      instrumentTestCompile 'org.robolectric:robolectric:2.+'
      instrumentTestCompile 'junit:junit:4.+'
    }
Go ahead and sync the project (Tools > Android > Sync Project with Gradle Files) so the libraries are downloaded and appear in your project's External Libraries.
Gradle Plugin
Next we will install a gradle plugin for running our tests. One widely used example is the recently deprecated gradle-android-test-plugin, but I went with Novoda's robolectric-plugin instead. To do the same, edit the root build.gradle:
    buildscript {
      repositories {
        mavenCentral()
        // Add this repository:
        maven {
          url 'https://oss.sonatype.org/content/repositories/snapshots'
        }
      }

      dependencies {
        classpath 'com.android.tools.build:gradle:0.8.+'
        // And this dependency:
        classpath 'com.novoda.gradle:robolectric-plugin:0.0.1-SNAPSHOT'
      }
    }

    allprojects {
      repositories {
        mavenCentral()
        // And finally this repository again.
        maven { url 'https://oss.sonatype.org/content/repositories/snapshots' }
      }
    }
Sync again to install the plugin, and apply the plugin to app/build.gradle:
apply plugin: 'robolectric'The plugin works by creating a new sourceset called "test" alongside the existing "main" sourceset, in place of where we would normally have the "instrumentTest" -sourceset.
Add a Test
At this point we're ready to add a test to the source tree and start verifying bits of our tooling. Create the directory app/src/test/java/com/example/app/test (or whatever matches your main app package hierarchy) and add the following code as e.g. RoboTest.java in that directory:
    package com.example.app.test;

    import org.junit.Test;
    import org.junit.runner.RunWith;
    import org.robolectric.RobolectricTestRunner;
    import static org.junit.Assert.*;

    @RunWith(RobolectricTestRunner.class)
    public class RoboTest {
      @Test public void testTrueIsTrue() throws Exception {
        assertEquals(true, true);
      }
    }
Android Studio does not yet recognise app/src/test/java as a source directory and therefore the normal Java tooling won't work beyond syntax highlighting, but the test is runnable from the console! Try it:
$ ./gradlew robolectricYou can also just run the check task and the test will be executed along with lint and the rest. Try toggling one of the booleans in the assert and see the test fail. Joyous! Test results are generated in app/build/test-results, so at this point you are ready to set up your CI to parse jUnit test results from there.
IDE Integration
Now let's get Android Studio to treat our test directory as a source directory to get autocompletion and all the other modern niceties. One great thing about Android Studio is that the gradle build files are the ultimate truth about project structure, so you don't get the problems that might stem from IDE project files and build files drifting apart. The downside is that there is no way in the UI to tell Android Studio to treat any given directory as a source directory, which is why we have to munge the project file ourselves. Thankfully Bernd Bergler has already done the hard work for us, so all we have to do is integrate his solution into app/build.gradle:
task addTest {
  def src = ['src/test/java']
  def file = file("app.iml")
  doLast {
    try {
      def parsedXml = (new XmlParser()).parse(file)
      def node = parsedXml.component[1].content[0]
      src.each {
        def path = 'file://$MODULE_DIR$/' + "${it}"
        def set = node.find {
          it.@url == path
        }
        if (set == null) {
          new Node(node, 'sourceFolder', [
            'url': 'file://$MODULE_DIR$/' + "${it}",
            'isTestSource': "true"
          ])
          def writer = new StringWriter()
          new XmlNodePrinter(new PrintWriter(writer)).print(parsedXml)
          file.text = writer.toString()
        }
      }
    } catch (FileNotFoundException e) {
      // nop, iml not found
    }
  }
}
// always do the addtest on prebuild
gradle.projectsEvaluated { preBuild.dependsOn(addTest) }
Android Studio automatically generates .iml project files from gradle build files. This task edits the Android Studio project file app.iml and adds the test directory. The changes are lost whenever Android Studio rescans the gradle files, but right after that it runs a build and the task is hooked into that, so it's all good.
This version has a couple of tweaks, such as adding the new task into the normal build cycle a bit differently, and gracefully handling the absence of the .iml file. The latter is necessary in our case because we're gonna run the builds in CI, and there is no Android Studio there to generate the files in the first place.
After these changes and a sync run the test directory should show up as a source directory in Android Studio and all the Java tooling should work.
Running the Tests in Android Studio
Next we will set up Android Studio so that it allows us to run, monitor and debug the tests visually. Go ahead and generate a run configuration for the tests in Android Studio by right-clicking app/src/test/java and selecting Run > All Tests. Be sure to select the jUnit, not the Android test option:
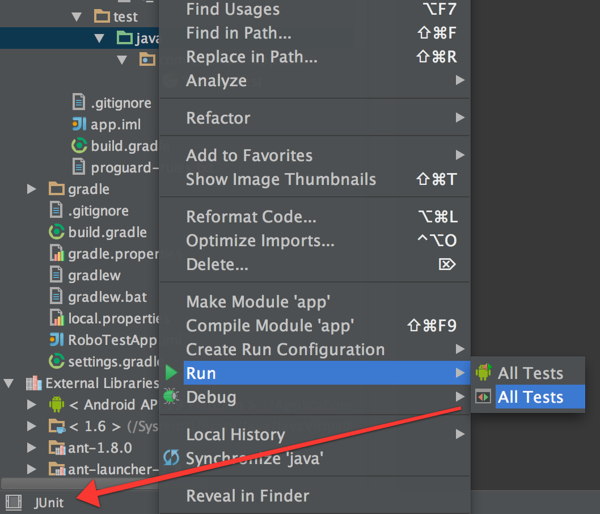
This run will fail with a complaint about "JUnit version 3.8 or later expected". The reason for this is that jUnit 4 is too far down the classpath, and now comes perhaps the least elegant part of this setup: as
Kostya Y explains, copy the whole contents of the console with the error message into a text editor and do this:
- Remove everything except -classpath "..."
- Move jUnit 4 to be the first thing in the classpath
Add an entry for the absolute path to the robolectric test classes directory as the last item in the classpath, in this case /path/to/MyProject/app/build/classes/robolectric.
Now if you try re-running the configuration, you might get an UnsupportedClassVersionError if you've previously run the tests in console, or at least this happens to me on my Mac. I don't know the actual root cause, but if this happens, just do Build > Clean Project to clear out previously built classes.
One final step: the jUnit test run configuration depends on the make task for the project by default, but this does not generate the test classes. We therefore need to add a custom gradle run configuration to run the robolectricClasses gradle task:

Add this new configuration to the "Before launch" tasks of your jUnit run configuration, and the classes are generated before test runs. The setup is unfortunately a bit creaky in that you might still get errors about missing classes sometimes, but re-running the tests should take care of that.
The Missing Manifest
You should have noticed by now that Robolectric complains about not being able to find your Android Manifest. We'll fix that by writing a custom test runner. Add the following as app/src/test/java/com/example/app/test/RobolectricGradleTestRunner.java:
package com.example.app.test;
import org.junit.runners.model.InitializationError;
import org.robolectric.AndroidManifest;
import org.robolectric.RobolectricTestRunner;
import org.robolectric.annotation.Config;
import org.robolectric.res.Fs;

public class RobolectricGradleTestRunner extends RobolectricTestRunner {
  public RobolectricGradleTestRunner(Class<?> testClass) throws InitializationError {
    super(testClass);
  }

  @Override protected AndroidManifest getAppManifest(Config config) {
    String myAppPath = RobolectricGradleTestRunner.class.getProtectionDomain()
      .getCodeSource()
      .getLocation()
      .getPath();
    String manifestPath = myAppPath + "../../../src/main/AndroidManifest.xml";
    String resPath = myAppPath + "../../../src/main/res";
    String assetPath = myAppPath + "../../../src/main/assets";
    return createAppManifest(Fs.fileFromPath(manifestPath),
      Fs.fileFromPath(resPath),
      Fs.fileFromPath(assetPath));
  }
}
Remember to change the RunWith annotation in the test class. Now the warning about the manifest should have disappeared, but there is a new problem, evident when running the tests in the console:
:app:robolectric FAILED FAILURE: Build failed with an exception. * What went wrong: Execution failed for task ':app:robolectric'. > superClassName is empty!This extremely unhelpful error is due to the gradle Robolectric plugin trying to treat your newly minted test runner as a test, and failing hard. The solution is to tweak the way test classes are found, by adding the following to app/build.gradle:
    // prevent the "superClassName is empty" error for classes not annotated as tests
    tasks.withType(Test) {
      scanForTestClasses = false
      include "**/*Test.class" // whatever Ant pattern matches your test class files
    }
Now you finally have the setup we strived for: working unit testing in both Android Studio and your favorite CI environment.
Edit: Windows Addendum
Naturally immediately after this post been published I learned that there is a bug in the Robolectric plugin on Windows. Thankfully Novoda said they'd review the fix, so fingers crossed! For the time being, if you are developing on Windows, there is a workaround: instead of adding the plugin through the dependency mechanism, just dump the plugin source (after slightly massaging the imports) from the branch with the fix directly into app/build.gradle. I made a gist with the relevant parts.
 Ilkka PoutanenSenior Specialist